
1280 Watts of Solar Install
My 1280 watt solar setup:
 (When 1st hooked up at 3 pm)
The Panels (pics below):
Each panel is 320 watts, for a total output of 1280 watts. I know that 1280 watts is a bit of overkill, but there are several reasons I went so big. First, I had the room. Amazingly, I could add three more panels on my roof if I wanted to (I don’t). Second, I don’t want to mess with tilting them. Third, you have to think about the days that are overcast and/or less than optimal. On those days, even if I am only producing 25% of its capability, that’s still over 300 watts. The solar panels were bought from Solar Wholesale. They were offering an incredible deal, but it was for a whole pallet. I called and spoke with Douglas Hewitt and asked if he could give me the same price for only four panels. I’m not sure of his job title, but they hired the right guy. He happily accepted my offer and even helped me load them into my F250. I got about a 50% discount versus buying these anywhere else online.

The Mounts (pics below):
There are lots of opinions on mounts online. My panels are larger than the typical panel, so I wanted to be 100% sure they weren’t flying off. The mounts that I made are an incredible amount of overkill, but as a wise person once said, anything worth doing is worth overdoing. I used 1 1/2″ aluminum angle and #12 1 1/4″ sheet metal screws.
The Controller (pics below):
I went with a Midnite Solar Classic SL-150, which I ordered off of ebay. It is an MPPT controller that can output up to 96 amps, more than I’ll ever need. This controller allows basically anything you would want, such as a battery temperature compensator, or adding a shunt (Whizbang Jr.) that lets the unit show the current amps being used and remaining battery amp hours. Install is amazingly simple, just two wires input from all the panels, then two wires to the battery bank, and then a simple ground wire. The display panel is easily removable and can be mounted anywhere you please. I installed mine in the ‘command center’ of the RV. The display panel and the solar controller connect with a simple phone cord. All phone cords have the ability for 6 wires, but usually they are sold with only 4, so be sure to order (I used ebay) a 6 wire reversed phone cord. Midnite Solar’s website has a simple form, where you can enter the specs of your solar panels, and it will tell you if you are within parameters or not for a given controller, along with what performance to expect.
The Batteries (pics below):
You can never have enough, at least in an RV. I went with (4) 6 volt Trojan T-145 Plus batteries, at 260 amp hours per pair, for a total of 520 amp hours. I ordered them online from the cheapest place I could find, and had them shipped to a local store. Although shipping was free, there was a $30 handling fee. When I went to pic them up at Battery Systems of Salt Lake City, I spoke to Hanna. She is awesome by the way. She quickly explained to me that these batteries are commonly carried by several stores, there is no need to order them online. Originally I had only ordered two batteries, but her prices were cheaper than online, including tax, so I bought two more. Since this is a new project, she did not charge me a core charge for any of the four batteries. I know she’s local to Salt Lake City, but I highly recommend her and the business if you’re ever in the area.
The Wiring Diagram:

Ok, here are the pics of the equipment and the install:


The battery box:

The mounts:

My friend and I getting the panels onto the roof, using a 12′ ladder:

Basic positioning done, drilling holes is next. Scared but excited:

Lifting the panel to put down eternabond tape underneath:

After the tape was laid down, I put the panel down and marked the holes so I knew where to predrill:

After I drilled the holes, I put a circle of leveling sealant around the holes:

When I lowered the panel down, the excess sealant came through the mount holes, as seen on the right:

Visual of the sealant around the screws after they are tightened:

I then puddled the sealant to cover the screw head:

Above view when done:

Side view of the covered screw heads:

Overhead of the finished product:
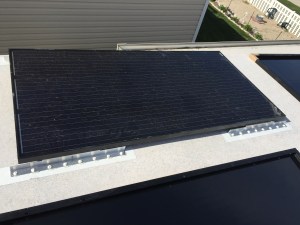
Another overhead:

Another overhead:

Side view to show the gap for the heat dissipation:
